Apple Menu
This feature is available since 1.6.0
Apple menu — is a combination of two menu’s. The first one shows top-level categories only, the second one - shows children of active category with nice icons.
Of course, nobody can stop you from creating the same menu without using two menu’s - you can show the same children in a dropdown of the first menu. Intrested? Go ahead - it’s available too
Contents
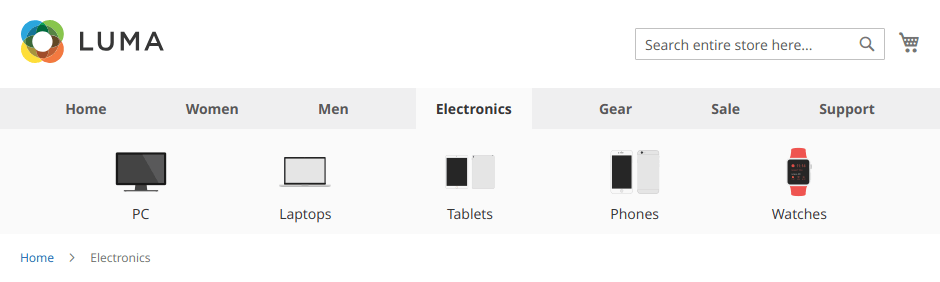
Top-level Menu
- Navigate to Swissup > NavigationPro page, and press Add New Menu.
- Create new “AppleMenu” menu using “Simple Menu” preset.
-
Click Menu Settings button and change the following fields:
Maximal Depth: 1 CSS Class: justify-evenly caret-hidden - That’s all. Clear Magento’s cache and see the result on the frontend.
Secondary Menu
- Navigate to Swissup > NavigationPro page, and press Add New Menu.
- Create new “AppleMenuSecondary” menu using “Simple Menu” preset. Leave “Replace Top Menu at” option empty.
-
Expand top-level category in the tree on the left side, and fill its children “Advanced Settings” with following values:
Change “Name as Html” option only:
<a href="{{navpro data='url'}}" class="{{navpro data='class'}} text-center flex flex-column items-center">
    <img src="{{media url='wysiwyg/image.png'}}" alt="" />
    {{navpro data="name"}}
</a>
Repeat this operation for each child.
“Name as Html” content is identical for all chilren. You need to change
<img src="{{media url='wysiwyg/image.png'}}" alt="" />only. - Navigate to Content > Widgets and press Add Widget button
- Create “Navigationpro” widget and assign it you your active theme. Press Continue
-
Fill the form as follows:
Storefront properties tab
Option Value Widget Title Navigationpro AppleMenuSecondary Assign to Store Views All store views Layout updates Display on Specified Page Page Catalog Category Container After Page Header Top Widget Options tab
Option Value Menu AppleMenuSecondary Show Active Branch Only Yes Show Parent Category No Additional CSS Class justify-evenly text-center navpro-linkbar xs-hide sm-hide Save the widget.
- That’s all. Clear Magento’s cache and see the result on the frontend.
Custom CSS
-
Create
_custom.lessfile in your active theme with the following content:@media (min-width: 768px) { .page-wrapper { .nav-sections { margin-bottom: 0; .navpro { .li-item { &.active { background: #fafafa; > a { padding-left: 20px; padding-right: 20px; } } } } } .top-container { margin: 0 0 15px; max-width: none; background: #fafafa; .navpro { margin: 0 auto; max-width: 1280px; a { color: #333; } } } } }Save the file.
-
Run following commands to regenerate compiled styles:
cd magento/root/folder

# remove previously deployed navigationpro styles
find pub/static var/view_preprocessed -type d -regex ".*Navigationpro.*css" -exec rm -rf {} \;

# run deployment command
php bin/magento setup:static-content:deploy en_US en_GB