Iconic Menu
Contents
Top Menu
Steps to create Menu
- Navigate to Swissup > NavigationPro page, and press “Add New Menu”.
-
Fill the with following values:
Name: Some name that will explicitly describe the menu Type: Iconic Import Categories From: Select Root Category Replace Top Menu at: Select Stores that will use this menu - Save the form. Now you can open your store frontend and check if everything works fine.
Tips and Tricks
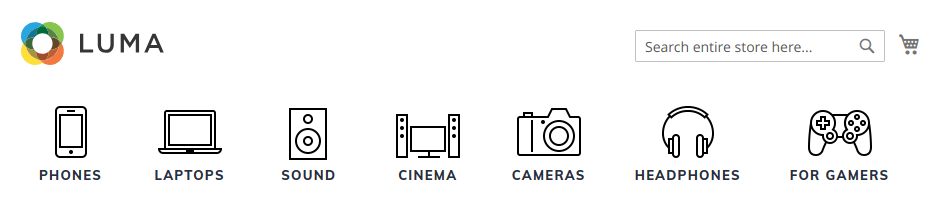
Category Icons
We use EasyCatalogImages to add thumbnail attribute to each category. You can replace it with any other attribute. Open menu in backend, then navigate to Menu Settings > Open Item Settings > First level item settings. Here you can edit template that shows category icon:
<a href="{{var item.url'}}" class="{{var item.class}}">
    {{depend remote_entity.thumbnail}}
        <img class="xs-hide sm-hide" width="50px" src="{{media url=''}}/catalog/category/{{var remote_entity.thumbnail}}" />
    {{/depend}}
    <span>{{var item.name}}</span>
</a>
Per-item Icon Settings
Sometimes you may want to change icon for particular item only. Open menu in backend, click on the category to edit in categories tree on the left, and use “Name as Html” on the right (“Advanced Settings” fieldset). Here is an example:
<a href="{{var item.url}}" class="{{var item.class}}">
<img class="xs-hide sm-hide" src="{{media url="wysiwyg/iconfinder_multimedia-37_2849799.png"}}" alt="" />
<span>{{var item.name}}</span>
</a>
Dropdown Menu
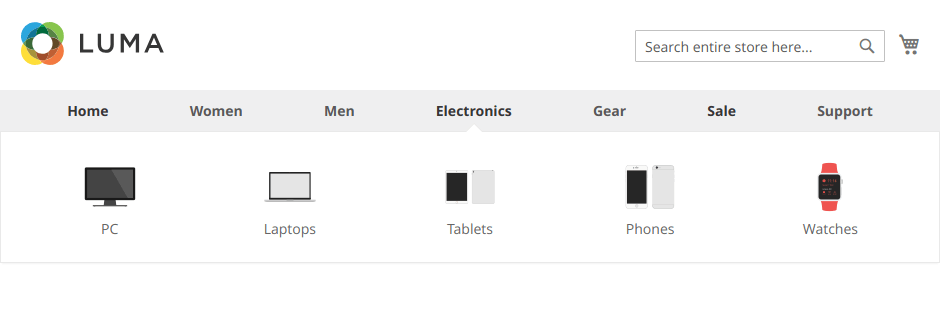
This menu looks similar to Apple Menu, except it shows dropdowns and uses one menu instance only.
- Navigate to Swissup > NavigationPro page, open menu to edit.
-
Click Menu Settings button and change the following fields:
Maximal Depth: 0
CSS Class: justify-evenly caret-hidden
First level dropdown settings
Width: Full-Width
Layout:
    Edit subcategories item:
        Columns Count 5
Save the changes.
-
Expand top-level category in the tree on the left side, and fill its children “Advanced Settings” with following values:
Change “Name as Html” option only:
<a href="{{navpro data='url'}}" class="{{navpro data='class'}} text-center flex flex-column items-center">
    <img src="{{media url='wysiwyg/image.png'}}" alt="" />
    {{navpro data="name"}}
</a>
Repeat this operation for each child.
“Name as Html” content is identical for all chilren. You need to change
<img src="{{media url='wysiwyg/image.png'}}" alt="" />only. - That’s all. Clear Magento’s cache and see the result on the frontend.