Checkout Fields Usage Examples
- Order Comment Field
- Add notice, tooltip, and placeholder for the field
- Display Fields in Order Email
- Display Fields at Checkout Success Page
- Display Fields in Orders Grid
- Get Fields Values in Orders API
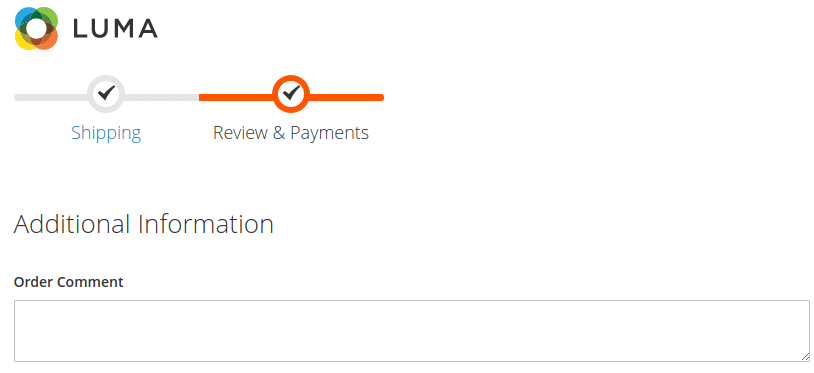
Order Comment Field
To add order comment field on checkout, follow below steps:
- Go to
Swissup > Checkout > Checkout Fields - Press
Add New Fieldbutton - Fill
Default Label - Select
Store Viewwhere to show the field - In
Catalog Input TypeselectText Area - If required, fill other optional properties, such as
Values Required,Sort OrderandDefault Value - Specify labels for other store views on
Manage Labelstab if required - Press
Save Fieldbutton - Go to checkout and check the field you created:
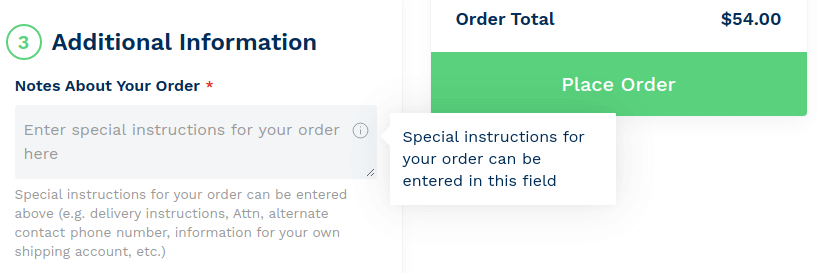
Add notice, tooltip, and placeholder for the field
You can specify a notice, tooltip, and placeholder for the field in
the Advanced Field Properties section when creating or editing the field at
Swissup > Checkout > Checkout Fields
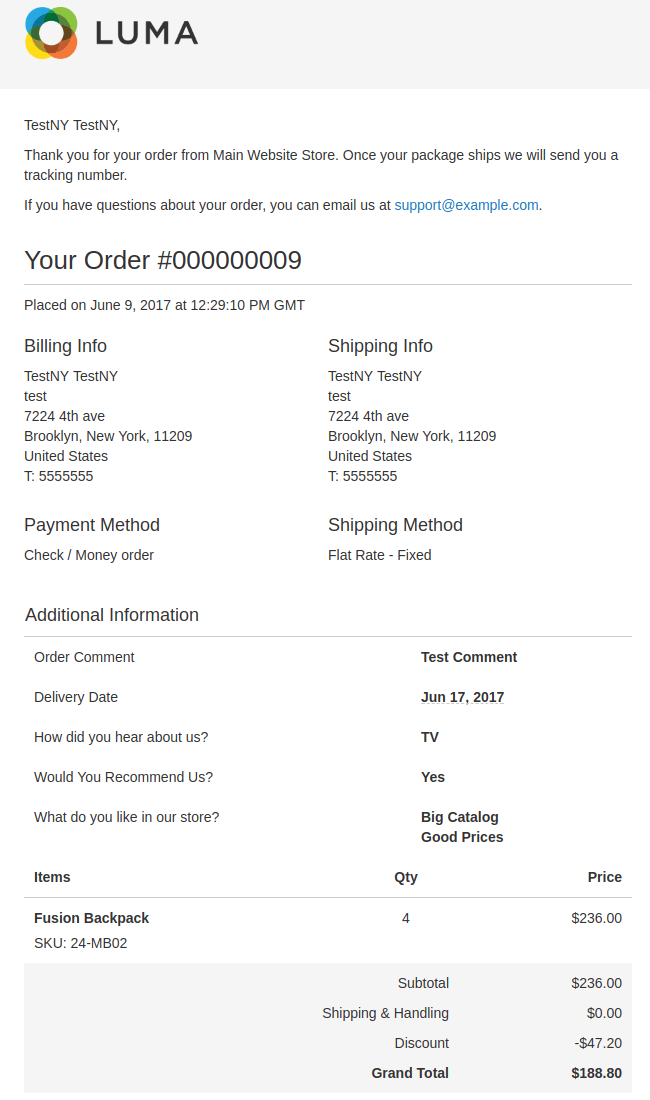
Display Fields in Order Email
In order to display checkout fields in order emails, follow next steps:
- Go to
Marketing > Communications > Email Templates - Press
Add New Templatebutton - Select template, for example
New Order for Guest, and pressLoad Templatebutton - Give name for template in
Template Namefield -
In
Template Contentplace the following code where you want to show checkout fields:{{block class="Swissup\CheckoutFields\Block\Adminhtml\Order\View\Fields" area="frontend" template="Swissup_CheckoutFields::email/order/fields.phtml" order_id=$order_id}}if you want to display only specific fields, list comma-separated attribute codes in
fields_to_showparamether:{{block class="Swissup\CheckoutFields\Block\Adminhtml\Order\View\Fields" area="frontend" template="Swissup_CheckoutFields::email/order/fields.phtml" order_id=$order_id fields_to_show="order_comment,favourite_products,delivery_date"}} - Press
Save Templatebutton - Go to
Stores -> Configuration -> Sales > Sales Emails -> Order, select new template inNew Order Confirmation Template for Guestand pressSave Config - Check order email with checkout fields:
Display Fields at Checkout Success Page
Use module Checkout Success Page module to get custom checkout fields at success page.
- Make sure Checkout Success page is enabled. Go to
Stores>Configuration>Swissup Checkout>Success Pageand check option ‘Enabled’ in ‘General’ section. - Go to section ‘Page Layout’. Drag
Checkout Fieldsblock from ‘Blocks available on Success Page’ and drop at ‘Layout of Success Page’ in place where you want to see checkout fields. - Save config or use ‘Save and Start Preview’ button to check how success page looks.
Display Fields in Orders Grid
To display checkout fields in orders grid, follow next steps:
- Go to
Swissup > Checkout Fields, edit the field and setAdd to Column OptionstoYes. - Go to
Sales > Ordersand select fields you want to display inColumnsdropdown.
Get Fields Values in Orders API
Since 1.3.0 version checkout fields values can be accessed in API
using orders and orders/{id} endpoints.
