Adding the Sizing Chart
Adding a sizing chart button to your website or application can greatly enhance the user experience, providing quick access to essential sizing information for products. Here’re the steps to seamlessly integrate a sizing chart button into your product pages.
Create a CMS Block
Go to the Content > CMS Blocks section of your admin and create a Sizing Chart block:
- Name:
Sizing chart - ID:
sizing_chart -
Add the following “html content” via PageBuilder:
  <div data-role="sizing-chart" style="display: none;">
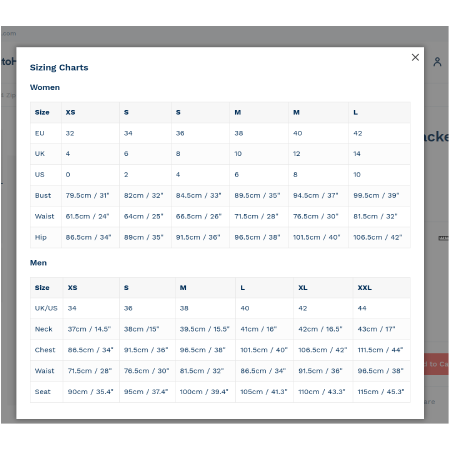
      <h3 style="margin: -10px 0 20px;">Sizing Charts</h3>
      <h4>Women</h4>
      <table class="table-grid table-striped">
          <thead>
              <tr>
                  <th>Size</th>
                  <th>XS</th>
                  <th>S</th>
                  <th>S</th>
                  <th>M</th>
                  <th>M</th>
                  <th>L</th>
              </tr>
          </thead>
          <tbody>
              <tr>
                  <td>EU</td>
                  <td>32</td>
                  <td>34</td>
                  <td>36</td>
                  <td>38</td>
                  <td>40</td>
                  <td>42</td>
              </tr>
              <tr>
                  <td>UK</td>
                  <td>4</td>
                  <td>6</td>
                  <td>8</td>
                  <td>10</td>
                  <td>12</td>
                  <td>14</td>
              </tr>
              <tr>
                  <td>US</td>
                  <td>0</td>
                  <td>2</td>
                  <td>4</td>
                  <td>6</td>
                  <td>8</td>
                  <td>10</td>
              </tr>
              <tr>
                  <td>Bust</td>
                  <td>79.5cm / 31"</td>
                  <td>82cm / 32"</td>
                  <td>84.5cm / 33"</td>
                  <td>89.5cm / 35"</td>
                  <td>94.5cm / 37"</td>
                  <td>99.5cm / 39"</td>
              </tr>
              <tr>
                  <td>Waist</td>
                  <td>61.5cm / 24"</td>
                  <td>64cm / 25"</td>
                  <td>66.5cm / 26"</td>
                  <td>71.5cm / 28"</td>
                  <td>76.5cm / 30"</td>
                  <td>81.5cm / 32"</td>
              </tr>
              <tr>
                  <td>Hip</td>
                  <td>86.5cm / 34"</td>
                  <td>89cm / 35"</td>
                  <td>91.5cm / 36"</td>
                  <td>96.5cm / 38"</td>
                  <td>101.5cm / 40"</td>
                  <td>106.5cm / 42"</td>
              </tr>
          </tbody>
      </table>
      <h4>Men</h4>
      <table class="table-grid table-striped">
          <thead>
              <tr>
                  <th>Size</th>
                  <th>XS</th>
                  <th>S</th>
                  <th>M</th>
                  <th>L</th>
                  <th>XL</th>
                  <th>XXL</th>
              </tr>
          </thead>
          <tbody>
              <tr>
                  <td>UK/US</td>
                  <td>34</td>
                  <td>36</td>
                  <td>38</td>
                  <td>40</td>
                  <td>42</td>
                  <td>44</td>
              </tr>
              <tr>
                  <td>Neck</td>
                  <td>37cm / 14.5"</td>
                  <td>38cm /15"</td>
                  <td>39.5cm / 15.5"</td>
                  <td>41cm / 16"</td>
                  <td>42cm / 16.5"</td>
                  <td>43cm / 17"</td>
              </tr>
              <tr>
                  <td>Chest</td>
                  <td>86.5cm / 34"</td>
                  <td>91.5cm / 36"</td>
                  <td>96.5cm / 38"</td>
                  <td>101.5cm / 40"</td>
                  <td>106.5cm / 42"</td>
                  <td>111.5cm / 44"</td>
              </tr>
              <tr>
                  <td>Waist</td>
                  <td>71.5cm / 28"</td>
                  <td>76.5cm / 30"</td>
                  <td>81.5cm / 32"</td>
                  <td>86.5cm / 34"</td>
                  <td>91.5cm / 36"</td>
                  <td>96.5cm / 38"</td>
              </tr>
              <tr>
                  <td>Seat</td>
                  <td>90cm / 35.4"</td>
                  <td>95cm / 37.4"</td>
                  <td>100cm / 39.4"</td>
                  <td>105cm / 41.3"</td>
                  <td>110cm / 43.3"</td>
                  <td>115cm / 45.3"</td>
              </tr>
          </tbody>
      </table>
  </div>
  <script type="text/javascript">
  require([
      'Magento_Ui/js/lib/view/utils/async',
      'Magento_Ui/js/modal/modal',
      'mage/translate'
  ], function ($, modal) {
      'use strict';

      $.async('[data-role=swatch-options] .swatch-attribute.size .swatch-attribute-label', function (element) {
          var html = [
              '<a href="#" data-action="view-sizing-chart" class="option-help-text">',
                  '<svg width="25" height="10" viewBox="0 0 25 10" fill="none" xmlns="http://www.w3.org/2000/svg">',
                      '<path stroke="#000" stroke-width="1.5" d="M1 1h23v8H1z"></path><path stroke="#000" d="M12.5 1v6M4.5 1v4M16.5 1v4M8.5 1v4M20.5 1v4"></path>',
                  '</svg>',
                  $.mage.__('Size chart'),
              '</a>'
          ].join('');

          $(element).append(html);
          modal({
                  responsive: true,
                  trigger: '[data-action=view-sizing-chart]',
                  buttons: []
              },
              $('[data-role=sizing-chart]').show()
          );
      });
  });
  </script>
  <style>
  .product-info-main .product-options-wrapper .swatch-attribute-label {
      display: flex;
      justify-content: space-between;
  }
  .product-info-main .product-options-wrapper .swatch-attribute-label svg {
      margin-right: 5px;
  }
  </style>
Create a Widget
Go to the Content > Widgets section of your admin and create a Sizing Chart widget:
- Type:
CMS Static Block - Widget title:
Sizing Chart - Layout Updates:
Configurable product -
Container:
Before Page Footer - Widget Options: Choose your “Sizing Chart” CMS block
Done
Clear the store cache and refresh your store product page.
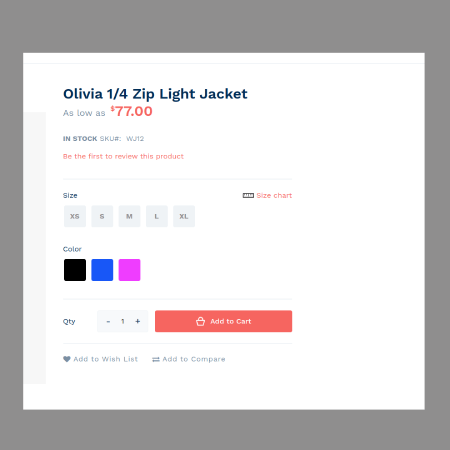
If everything was done correctly, you’ll see the Sizing chart link and a relevant icon.
To improve the button styling, you may add your CSS directly to the CMS block content in the
<style>tag


